Hello all!
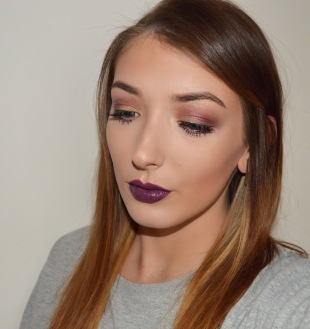
For my first ever blog post I wanted to create a look that I would actually wear throughout the day or night, so inspired by the change in season, (although the UK can’t make it’s mind up yet) I decided to do this look based around Autumn, using warm cranberry colours. 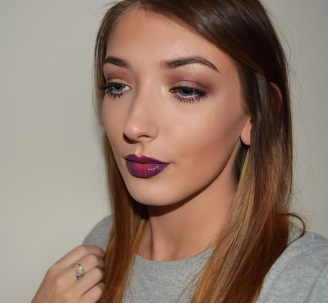 This is the look using rich, warm tones all throughout the face. I have shown all of the products I used below, obviously everyone prefers to do and use different things with their make up this is just one of the ways I like to do my own, and hopefully gives some inspiration.
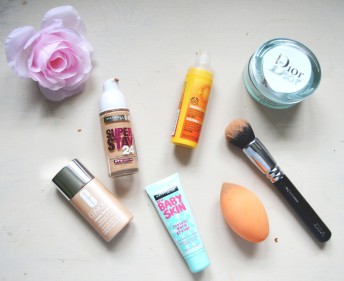
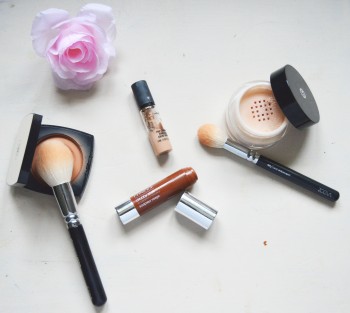
I started with prepping my skin which always starts with my Pro-Youth Silk Creme from Dior, this is a perfect moisturiser for my skin as it re-hydrates without being too oily underneath foundation. I have moderately large pores therefore I need a pore eliminating primer and at the moment I am loving the Baby Skin instant pore eraser from Maybelline, I only use this on my cheeks and nose. To prime my skin everywhere else I use the Body shop Vitamin C skin reviver, (which I would definitely recommend if you want effortlessly dewy skin). With my skin prepped I can finally start to apply foundation, I mix Maybelline stay perfect and even better from Clinique, to create that medium matte-dewy finish, buffing into the skin until basically my arm hurts. For highlighting under my eyes, nose, forehead and chin I use a pump of Mac pro longwear concealer and push it into the skin using my Real Techniques version of a beauty blender, then to set that I dust on some loose powder from Giorgio Armani. For contour I used the Clinique contour stick (probably too much for a day time look but used in moderation it gives good definition), only popping this in the hollows of my cheeks and forehead and buffing in throughly.
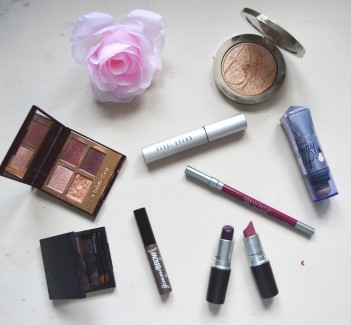
With the face done I start with my eyeshadow, using my Zoeva brushes I buffed a transition colour into my crease, which was just a basic nude colour from the BH Cosmetics tropical matte palette (BH palettes are such a great buy seeing as they are pretty pigmented and cheap!). Then taking my ‘vintage vamp’ quad from Charlotte Tilbury to take the cranberry colours through the lid and crease, this quad is perfect as it literally screams Autumnal colours to me. Just working this through, adding more product and then blending away the edges until I’m happy I can add the darkest colour to the outer ‘v’ of my eye, and finally add the gold from the palette to the centre of my eye for brightness (dependent on your eye shape as to how far a dark shadow can be brought in). As I was applying falsies I ran a bit of black just along the lash line to hide the join, I also used the Ardell wispies. Lastly I took some of the darkest colour to run along my bottom lashes and put a coat of mascara on, for some reason my bottom lashes are longish and thick but my top lashes are just not feeling it, ever!
For the final touches I fill in my brows using the Benefit brow zing, then combing upwards through the brow with some gimme brow after so they fall more natural as opposed to coloured in.
A quick bronze to warm the face with my Chanel bronzer, then I added a peach coloured blusher and dusted (heavily applied) the Dior Skin nude highlighting powder to the bridge of my nose, cupids bow, the very top of my cheeks and my brow bone (I am too much in love with a strong highlight!)
Finally (feels like I’m never getting there) I finished off the look completely with my dark lip. For this I lined my lips using the Urban Decay glide on lip pencil in venom and used two different shades of lipsticks form Mac. First I applied capricious and then cyber in the outer parts of my lips, the result almost looks ombre although that wasn’t planned.
I hope everyone enjoyed reading this description of the look I created and please leave me any comments on what you do differently or the same, or basically anything, Thanks!
Olivia x

Hi Olivia,
I really like to the look you have put together, the lip colour really works with your skin tone.
I have seen a couple of other blogs that do step-by-step over images which might work well also. But it looks really good, it might seem difficult when you are first starting out, but keep up with it, as your blog can earn you a lot of money when it is more established.
LikeLike
Hi Bee, thank you for your comment that’s great! Yes I would love to do a step by step look because I love beauty and creating looks, so I want to include as much information as possible.
I started my blog to help with my goal of becoming a make up artist. I’m planning on attending the Glauca Rossi school next year to gain training to start my career. I’m trying to look for internships and make up jobs at the moment, however it’s hard with no qualification.
If there’s any info you can give me or anything I need to do to better myself that would be much appreciated. Thank you,
Olivia
LikeLike
Wow I love this look you did such an amazing job! I love the ombre effect for the lipstick so cute I wouldn’t change a thing!!! Welcome to the world of blogging too keep up the great work!
Jasmine 🙂
colorubold.com
LikeLike
Aw thank you so much, that means a lot! 🙂
Olivia x
LikeLike